1 Tensor
参考网站: http://www.cvtutorials.com/
Tensor即张量,是一种独特的数据结构,与数组和矩阵类似,张量是更高维度的数据.
在Pytorch中,我们通常使用tensor来编码一个模型的输入 输出 参数
cvtutorials.com:
tensor类似于NumPy的ndarrays,只是tensor可以在GPU或其他硬件加速器上运行。事实上,tensor和NumPy数组通常可以共享相同的底层内存,不需要复制数据。tensor还为自动微分进行了优化(我们将在后面的Autograd部分看到更多关于这一点)。如果你熟悉ndarrays,你就会对Tensor API感到很熟悉
1 | import torch |
1.1 初始化Tensor
上面说到,numpy的数组/矩阵和tensor很像因此,tensor可以
- 直接进行数据创建
- 也可以通过Numpy数组初始化
- 还可以通过其他Tensor进行初始化
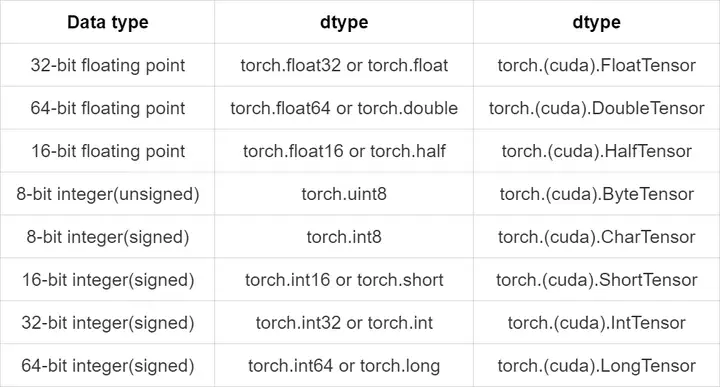
同时在初始化时,我们可以指定Tensor的数据类型,一般来说是自动推断的,常用数据类型如下
表中最后一行应该是Tensor Type而非dtype
1 | data = [ |
dtype: torch.int64  tensortype: torch.LongTensor
dtype: torch.int32  tensortype: torch.IntTensor
dtype: torch.int32  tensortype: torch.IntTensor
从其他的Tensor进行初始化会保留原本tensor的属性(形状,数据类型等)
但是我们可以明确重写,修改形状,修改数据类型
1 | x_ones = torch.ones_like(x_data) # retains the properties of x_data |
Ones Tensor:
 tensor([[1, 1],
        [1, 1]])

Random Tensor:
 tensor([[0.8011, 0.0121],
        [0.4066, 0.6354]])
除此之外还可以使用随机数和常数来初始化Tensor,并且可以使用shape来指定tensor的形状
shape是一个元组,决定了tensor的维度(形状)
- torch.rand(shape) 随机数创建shape形状的tensor
- torch.ones(shape) 创建shape形状的全为1的tensor
- torch.zeros(shape) 创建shape形状的全为0的tensor
- torch.eye(n,m) 创建n*m形状的对角线为1的tensor,这里的n!=m时取最小
1 | shape = (2,3,) |
Random Tensor:
 tensor([[0.5778, 0.2614, 0.6331],
        [0.7194, 0.4895, 0.6238]])

Ones Tensor:
 tensor([[1., 1., 1.],
        [1., 1., 1.]])

Zeros Tensor:
 tensor([[0., 0., 0.],
        [0., 0., 0.]])

Eye Tensor:
 tensor([[1., 0., 0.],
        [0., 1., 0.]])
1.2 Tensor的性质
1.2.1 属性
Tensor具有以下几个常用属性
- data: 数据
- shape: 形状
- dtype: 数据类型
- device: 存储设备,默认是在CPU上创建的,可以使用to方法移动到device上
1 | tensor = torch.rand(3,4) |
Data of tensor: tensor([[0.9182, 0.3992, 0.5154, 0.3928],
        [0.0441, 0.4885, 0.9013, 0.0895],
        [0.8495, 0.4128, 0.2496, 0.7116]], device='cuda:0')
Shape of tensor: torch.Size([3, 4])
Datatype of tensor: torch.float32
Device tensor is stored on: cuda:0
1.2.2 操作
Tensor移动
默认情况下,tensor是在CPU上创建的.我们需要使用.to方法明确地将tensor移动到GPU上.在不同的设备上复制存储size比较大的tensor,在时间和内存上都是很昂贵的
1 | tensor = torch.rand(3,4) |
Device tensor is stored on: cpu
Device tensor is stored on: cuda:0
1.2.3 索引和切分
Tensor是可以和Python的数组和矩阵一样进行索引和切分的
同样也是tensor[start:end:step]的形式,以step为间隔切出[start,end)这个区间
值得注意的是tensor不能直接像numpy的array一样进行arr[::-1]的反转或者反向切分,只能反向索引
要做的话需要进行numpy转化,numpy是可以反转和反向切分的
1 | tensor = torch.rand(4, 4) |
tensor([[0.4075, 0.4591, 0.3758, 0.5208],
        [0.4898, 0.8958, 0.7764, 0.4451],
        [0.6550, 0.6531, 0.3889, 0.7103],
        [0.4527, 0.0626, 0.3591, 0.7852]])
第一行:  tensor([0.4075, 0.4591, 0.3758, 0.5208])
第一列: tensor([0.4075, 0.4898, 0.6550, 0.4527])
最后一列: tensor([0.5208, 0.4451, 0.7103, 0.7852])
最后一列的倒序: tensor([0.7852, 0.7103, 0.4451, 0.5208])
最后一列的倒数两个: tensor([0.7852, 0.7103])
tensor([[0.4075, 0.0000, 0.3758, 0.5208],
        [0.4898, 0.0000, 0.7764, 0.4451],
        [0.6550, 0.0000, 0.3889, 0.7103],
        [0.4527, 0.0000, 0.3591, 0.7852]])
1.2.4 运算
Tensor可以进行运算,包括了
tensor.add(x):计算tensor[m*n]+x的值,x可以是一个数值/[m*n]/[m*1]/[1*n],那么就是将tensor中的元素/对应元素/行/列都加上x的数值/对应元素/行/列.
tensor.sub(x):计算tensor[m*n]-x的值,x可以是一个数值/[m*n]/[m*1]/[1*n],那么就是将tensor中的元素/对应元素/行/列都减去x的数值/对应元素/行/列.
tensor.mul(x):
这不是矩阵乘法,x可以是一个数值/[m*n]/[m*1]/[1*n],那么就是将tensor中的元素/对应元素/行/列都乘以x的数值/对应元素/行/列.tensor.div(x):
除法,x可以是一个数值/[m*n]/[m*1]/[1*n],那么就是将tensor中的元素/对应元素/行/列都除x的数值/对应元素/行/列,可以视作mul(1/x)torch.mv(A,x):
矩阵向量相乘,mat,vector,等价于\(A x^\text T\),通常我们的torch都是矩阵的,我们要配合torch.flatten(x)使用,假设A[m*n]那么向量长度必须是mtorch.mm(A,B):
矩阵乘法,要求A[m*n],B[n*k],输出[m*k],仅适用于二维Tensor,高维请使用torch.bmm()或者torch.matmul()torch.bmm(bMat1,bMat2): 要求bMat1[B*m*n],bMat2[B*n*d],输出[B*m*d],确保3-D矩阵且Batch size相同
tensor.sum():将tensor中所有的元素加和返回一个单元素tensor
tensor.prod():将tensor中所有的元素累乘返回一个单元素tensor
torch.dot(v1,v2):
向量内积,两个1-D向量的对应元素相乘,然后对这些乘积求和得到的结果.确保两个向量长度一致torch.inner(t1,t2): 沿最后一个维度乘积相加,要求t1[\(B_1\)*m*n],t2[\(B_2\)*k*n],其中的[\(B_1\)*m]和[\(B_2\)*k]满足mul的要求
torch.cross(t1,t2,dim=3): 返回t1和t2的维度dim中向量的叉积.t1和t2的大小必须相同,并且它们的dim维度的大小应该是3.如果未给出dim,则默认为找到的第一个尺寸为3的维度.
1 | t1 = torch.tensor([ |
[Origin tensor :
 tensor([[1., 2., 3.],
        [2., 3., 4.],
        [3., 4., 1.],
        [4., 1., 2.]])
tensor(32)
1.2.5 其他的一些常用函数
tensor.item():将单元素tensor转化为一个python值
torch.cat([t1,t2,t3],dim):concatnate,将tensor进行拼接,dim指定拼接维度,前一个参数指定拼接tensor和方式
原位操作,在一些tensor.X的操作后面加上下划线,就可以直接改变tensor这个张量
1 | t1 = torch.tensor([ |
tensor([[1., 2.],
        [3., 4.],
        [5., 6.],
        [7., 8.]])
tensor([[1., 2., 5., 6.],
        [3., 4., 7., 8.]])
tensor([[1., 2., 5., 6.],
        [3., 4., 7., 8.]])
add():
 tensor([[1., 2.],
        [3., 4.]])
add_():
 tensor([[2., 3.],
        [4., 5.]])
1.2.6 和Numpy的转换
CPU上的张量和NumPy数组可以共享它们的底层内存位置,改变一个将改变另一个.tensor转换为NumPy.
1 | t = torch.ones(5) |
t: tensor([1., 1., 1., 1., 1.])
n: [1. 1. 1. 1. 1.]
t: tensor([2., 2., 2., 2., 2.])
n: [2. 2. 2. 2. 2.]
t: tensor([2., 2., 2., 2., 2.], dtype=torch.float64)
n: [2. 2. 2. 2. 2.]如果您喜欢此博客或发现它对您有用,则欢迎对此发表评论。 也欢迎您共享此博客,以便更多人可以参与。 如果博客中使用的图像侵犯了您的版权,请与作者联系以将其删除。 谢谢 !